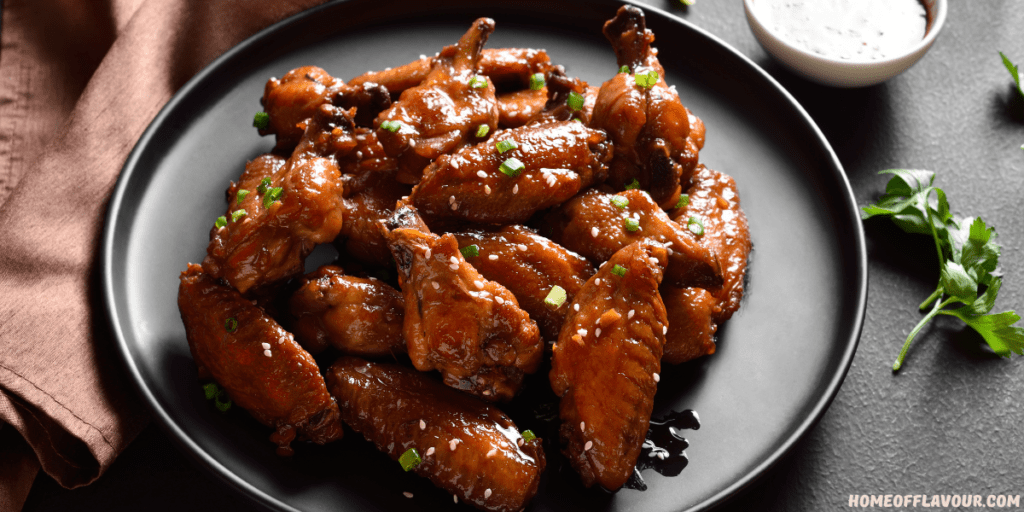
There’s fried chicken, and then there’s Korean Soy Garlic Fried Chicken. Imagine a crunch so profound it echoes, followed by juicy, tender meat, all enveloped in a glossy, savory-sweet garlic glaze that you’ll want to eat with a spoon. This is Dakgangjeong (닭강정), and it’s not just a meal—it’s a sensory experience. 🌟

Forget everything you know about heavy, greasy fried chicken. The Korean version is a masterpiece of texture and balance, famous for its light, crackly-crispy crust that magically stays crunchy even under a blanket of sticky sauce. Ready to bring this global sensation into your kitchen? Let’s dive in!
Why Is This Dish So Irresistible?
The magic of Dakgangjeong lies in its brilliant contrasts:
The Crunch: Achieved through a unique double-frying technique and a starch-based coating (not flour!).
The Sauce: A perfect umami bomb—salty from soy sauce, sweet from honey, and aromatic from a heap of fresh garlic and ginger.
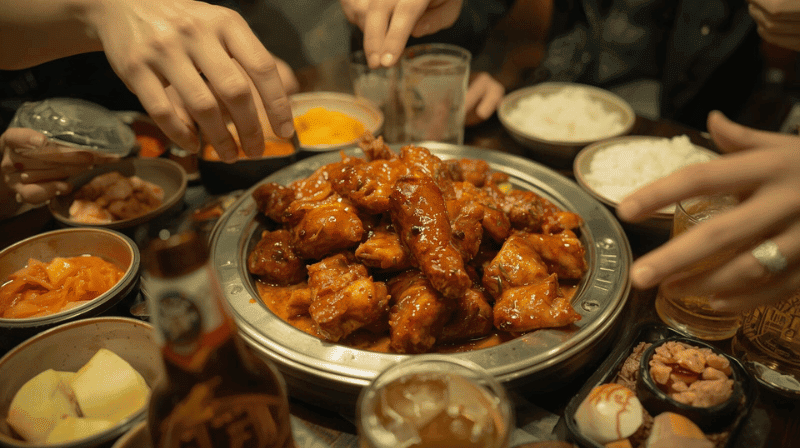
The Experience: In Korea, fried chicken is social food, meant to be shared with friends alongside cold beer (a combo called Chimaek). This recipe is your ticket to that fun, communal dining experience.
Gathering Your Ingredients: A Flavor Fusion 🛒
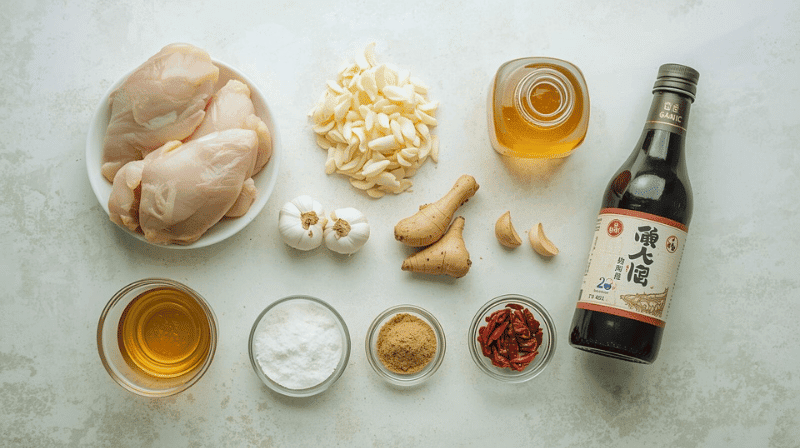
The right ingredients are key to authenticity, but don’t stress—substitutions are provided for a global kitchen!
For the Chicken & Marinade:
Chicken: 2 lbs (900g) boneless, skinless chicken thighs (ideal for juiciness) or wings/drumsticks. 🍗
Rice Wine: 2 Tbsp (tenderizes and removes gaminess). Sub: dry sherry.
Aromatics: 1 tsp each onion powder and garlic powder, ¼ tsp ginger powder, 1 tsp fine sea salt, and black pepper.
For the Ultra-Crispy Coating:
1.5 cups Potato Starch or Cornstarch. (Potato starch is the gold standard for the lightest, bubbliest crunch!).
For THE Soy Garlic Glaze:
Soy Sauce: ¼ cup (use tamari for gluten-free).
Sweeteners: 2 Tbsp brown sugar, 2 Tbsp honey. 🍯
Liquid: 2 Tbsp water, 2 Tbsp rice wine or mirin.
Fresh Aromatics: ½ Tbsp minced garlic, ½ Tbsp minced ginger (please, use fresh!).
Optional: 3 dried chilies for a whisper of warmth. 🌶️
For the Slurry (to thicken):
2 tsp cornstarch + 2 tsp water.
Your Step-by-Step Guide to Perfection 👩🍳
Step 1: Marinate the Chicken 🕒
Cut your chicken into uniform, bite-sized pieces. Toss them thoroughly with all the marinade ingredients. Let them rest for at least 30 minutes (or refrigerate for a few hours). This step builds foundational flavor and tenderness.
Step 2: Create the Crispy Shell 🧂
Place your starch in a large bowl. Dredge each piece of marinated chicken, pressing gently to ensure the coating is even and slightly clumpy. These clumps create extra crispy bits! Let the coated chicken sit for 5-10 minutes.

Step 3: The First Fry (The Cook) 🔥
In a deep pot or fryer, heat a neutral oil (like vegetable or canola) to 175°C (347°F). Use a thermometer! This is non-negotiable for perfect results.
Fry the chicken in batches to avoid overcrowding for 4-5 minutes. You’re not looking for color here, just to cook the chicken through. Remove and drain on a wire rack (this keeps them crisper than paper towels).
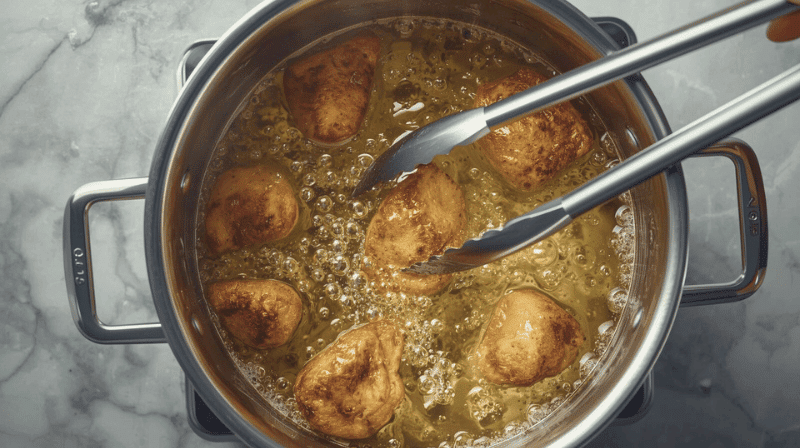
Step 4: The Second Fry (The CRUNCH) 🔥🔥
Bring the oil back to 175°C (347°F). Fry all the chicken again, in batches, for 2-3 minutes until it’s a deep, golden brown and incredibly crispy. Drain again on the wire rack. This double-fry method is the absolute secret to that iconic, glass-like crust.
Step 5: Whip Up the Sticky Glaze 🍯
While the chicken rests, combine all sauce ingredients except the slurry in a saucepan. Simmer over medium-low heat, stirring until the sugar dissolves. Let it bubble for 2-3 minutes. Stir the slurry mixture and add it to the sauce, cooking for another 1-2 minutes until it thickens into a gorgeous, syrupy glaze.
<img class=”aligncenter size-full wp-image-3599″ src=”https://homeofflavour.com/wp-content/uploads/2025/09/Untitled-design-53.png” alt=”A simmering pot of homemade sweet and savory soy garlic glaze for Korean fried chicken."
Placement: In the "Step-by-Step Guide" section, next to Step 5 (Whip Up the Sticky Glaze).” width=”800″ height=”448″ />
Step 6: Coat and Serve! 🌟
Place your super-crispy chicken in a large bowl. Pour the warm glaze over it and toss gently until every nook and cranny is gloriously coated. Garnish with a blizzard of toasted sesame seeds and finely sliced green onions. Serve immediately and prepare for applause!
Pro Chef Tips for Guaranteed Success 💡
Temperature is EVERYTHING. Too cool = greasy chicken. Too hot = burnt coating. A thermometer is your best friend.
Keep it Cold, Fry it Hot. For an even crispier crust, keep the marinated chicken in the fridge until the second you coat and fry it.
Don’t Drown it! For maximum crispiness, you can serve the sauce on the side for dipping instead of tossing.
Air Fryer Method: For a lighter version, spray the coated chicken with oil and air fry at 200°C (390°F) for 12-14 minutes, flipping halfway. Note: The texture will be different—less shatteringly crunchy, but still delicious.
How to Serve Your Masterpiece 🍽️
The Classic Way: With a side of sweet pickled radish and an ice-cold Korean beer or Soju. 🍺
The Modern Way: Pile it on a rice bowl with quick-pickled veggies, stuff it into tacos, or skewer it for the ultimate party appetizer. 🌮🥗
The Final Crunch 🌈
Mastering Dakgangjeong is a rite of passage for any home chef. It’s a recipe that seems daunting but is incredibly rewarding. That first bite—the symphony of the crunch, the juice, the sweet, and the savory—is a moment of pure culinary magic.
So, gather your ingredients, trust the process, and get ready to create a dish that’s more than the sum of its parts. It’s impossibly crispy, gloriously sticky, and utterly, utterly addictive.
Did you make this? Share your crispy creations and tag us! We love to see your kitchen triumphs. 🎉
FAQs Answered ❓
Q: Can I make this ahead of time?
A: You can marinate the chicken ahead, but for the best texture, fry and sauce it just before serving. Leftovers reheat well in an air fryer or oven.
Q: My chicken wasn’t crispy. What happened?
A: The usual suspects: oil temperature was too low, the pot was overcrowded, or the sacred double-fry was skipped.
Q: I can’t find potato starch. What now?
A: Cornstarch is a fantastic and widely available substitute. You’ll still get a great crunch.

Crispy, Sticky, Addictive: Mastering Korean Soy Garlic Fried Chicken (Dakgangjeong)
Ingredients
- For the Chicken & Marinade:
- 2 lbs 900g boneless, skinless chicken thighs or chicken wings, cut into bite-sized pieces
- 2 Tbsp rice wine or dry sherry
- 1 tsp onion powder
- 1 tsp garlic powder
- ¼ tsp ginger powder
- 1 tsp fine sea salt
- ½ tsp black pepper
- For the Coating:
- 1 ½ cups potato starch or cornstarch
- For the Soy Garlic Sauce:
- ¼ cup soy sauce use tamari for gluten-free
- 2 Tbsp brown sugar
- 2 Tbsp honey
- 2 Tbsp water
- 2 Tbsp rice wine or mirin
- ½ Tbsp fresh ginger minced
- ½ Tbsp fresh garlic minced
- 3 dried red chilies optional, for subtle heat
- For the Slurry to thicken sauce:
- 2 tsp cornstarch
- 2 tsp water
- For Garnish:
- 1 Tbsp toasted sesame seeds
- 2 green onions thinly sliced
Instructions
- Marinate the Chicken: In a large bowl, combine the chicken pieces with all the marinade ingredients: rice wine, onion powder, garlic powder, ginger powder, salt, and black pepper. Mix thoroughly until each piece is coated. Let it marinate for at least 30 minutes.
- Coat the Chicken: Place the potato starch (or cornstarch) in a separate large bowl. Dredge each piece of marinated chicken in the starch, pressing gently to ensure an even, clumpy coating. Shake off any excess and let it sit for 5-10 minutes.
- First Fry: Heat oil in a deep pot to 175°C (347°F). Working in batches to avoid overcrowding, carefully fry the chicken for 4-5 minutes until cooked through but still pale in color. Remove and drain on a wire rack.
- Second Fry: Reheat the oil to 175°C (347°F). Fry the chicken a second time, in batches, for 2-3 minutes until deeply golden brown and incredibly crispy. Drain on the wire rack.
- Make the Sauce: While the chicken rests, combine all sauce ingredients except the slurry in a small saucepan. Simmer over medium-low heat for 2-3 minutes, stirring until the sugar dissolves. (Optional: remove dried chilies for a smoother sauce). Mix the slurry ingredients in a small bowl, then whisk it into the simmering sauce. Cook for 1-2 more minutes until the sauce thickens to a syrupy glaze.
- Coat and Serve: Place the double-fried chicken in a large, clean bowl. Pour the warm sauce over it and toss gently until every piece is evenly coated. Transfer to a serving plate and garnish immediately with toasted sesame seeds and sliced green onions. Serve hot.
Video
Notes
Equipment
- Large mixing bowls
- Whisk
- Deep pot, Dutch oven, or deep fryer
- Cooking thermometer (essential)
- Wire rack
- Tongs or spider strainer
- Small saucepan
Notes
- Temperature is Key: Using a cooking thermometer is crucial for the perfect crispy texture. Frying at the wrong temperature is the most common cause of failure.
- Make Ahead: The chicken can be marinated overnight for deeper flavor. For the best texture, always fry and sauce the chicken just before serving.
- Reheating: Leftovers are best reheated in an air fryer or oven to restore crispiness.
- Air Fryer Method: For a lighter version, spray coated chicken with oil and air fry at 200°C (390°F) for 12-14 minutes, flipping halfway. The texture will be different but still delicious. Toss in the sauce after air frying.
Nutrition Notes
- Calories: 520
- Sugar: 15g
- Sodium: 1250mg
- Fat: 18g
- Saturated Fat: 5g
- Carbohydrates: 50g
- Fiber: 1g
- Protein: 38g
- Cholesterol: 110mg
Nutrition information is approximate and may vary based on cooking methods and specific ingredients used.